Here is the helpless, crumpled and folded chair as I found it.

After leaving Goodwill, I ran to Hobby Lobby and found this cute duck fabric on clearance ($3/yd).

And...these rosey knobs.

A final stop at Walmart to pick up spray paint and a long dowel finished my supply needs. The chair's prior owner had tried to brush paint the frame...horrible mistake. Spray painting is so much easier!! I prefer to use Krylon Paint+Primer. It's a little more pricey but eliminates a lot of sanding and paint layers. And...since the chair did not have its' original seat, I had to buy the dowel in order to place the seat fabric. This will make more sense later.
To start the upcycle, I took the chair apart and put the hinges and screws aside. I grabbed a block sander out of the building and gave the chair a quick buff and wash.

When that was done, It was time to let the spray painting begin. I did 2 coats of paint allowing to dry 24 hours between each coat. Our South Carolina humid summer heat makes the paint take longer to dry.
Here we are after paint session.

I also painted the hinges.

...Then reassembled the chair. That was the easy part. Now comes the measuring and sewing of the seat and back of the chair. First I measured the depth of the seat and cut the long dowel in 2 dowels that length. For my chair, it was 16" (this is also the depth for the seat fabric, I only added a 1/2" seam allowance for each side). Once the dowels were cut, I used them to measure how much fabric I would need to do the seat.

The width of the seat measured 21". I added a 1/2" seam allowance to each side. My final dimensions were 17" deep x 22" wide. I marked my fabric and cut it. I place it right sides together and using a 1/2" seam I double stitched the front and back seams...leaving the sides open. I trimmed away the excess and turned the fabric right side out. Then pressed the seams. I learned the hard way not to under estimate the value of ironing when sewing. You should never skip that step! 


Once it was right side out and pressed, I put the dowels inside the fabric.
Using my 1/2" seam allowance, I zig-zag stitched on top of the fabric to close up the sides and trimmed off the excess. I left the edges raw because you won't see them. Next I situated the dowels at the edge and was ready to assemble my seat.
To assemble the seat, I folded the chair together and slid the dowels down the groove. Then I opened the chair back up and tada...a seat!
Now..all ready to make the back. I used the same measuring techniques as with the seat. I measured width and height and added 1" to give a 1/2" seam allowance to each side. My dimemsions ended up being 7 1/2" high x 22" wide. I cut 2 pieces of fabric at this size. Then I folded up and pinned the 1/2" seam allowance on each top and bottom edge (long edges) of the fabric.
Then I stitched it in place.
Once all long edges on both pieces of fabric were stitched, I placed right sides together and double stitched the sides together using a 1/2" seam allowance. After that I turned the fabric right side out, pressed the seams. Then I went to measure.
Using pins, I marked where I needed to stitch so that the fabric would slide right over the wooden posts.
I pulled the fabric back off the chair and went inside to measure the distance between the edge of the fabric and the pins. For my chair it was 1 1/2". So I top stitched 1 1/2" from the edge to make a tube to slide over the posts.
I was now ready to close up the long edges. I simply turned the fabric and top stitched the pieces together between each 1 1/2" seam I just made. Be careful not to stitch past that or you will close up your tubes.
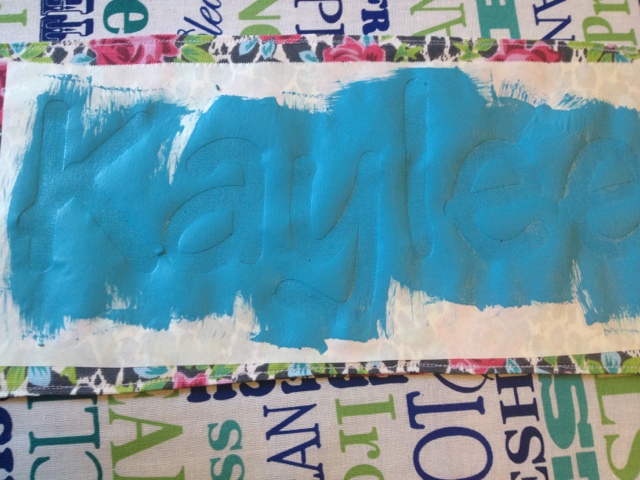
I did a quick fit test then proceeded. No director is complete without their name on the back. Therefore I pulled out my Cricut and freezer paper to make a stencil. (If you have thick fabric such as the duck, you can do this now. If you are using a thin fabric, do this step before stitching the back close as the paint may bleed through) You can also do this by hand using a print and trace method and cutting the stencil out with a utility knife. At any rate, once you have your stencil, you're ready to iron it in place.
Make sure all edges are down completely. Next I chose some turquoise acrylic paint and applied it liberally around the edge of the letters then smoothed it using a sponge brush. The reason I used a lot of paint was to gain coverage without having to use a lot of pressure. I didn't want to have the paint come through the other side.
Gave a quick blow dry...
...then peeled off the stencil once the paint was dry to touch.
Last, I put the back on the chair. Drilled some holes for the knobs and placed them in the chair.
From drab to fab!!! Couldn't be happier with the results!